Idling

The last couple of weeks have been a whirl-wind. I’ve had a few wee medical issues and Cindy’s son got married. I promise not to show you my scars, but I can’t resist bragging about my sweet nephew and his lovely new bride:

IMG_1529

Mr. and Mrs. TRH. They are adorbs!

So amongst all the festivities and the bandage changes and Netflix marathons, our quilting time has been spent catching up on a lot of binding work and even more brainstorming sessions about upcoming projects. Soon we will unveil some exciting new patterns that will give you options for quilt-gifting during all kinds of special life moments.

This weekend was the first chance I had to go garage/tag/estate saling in quite some time. After I finished my laundry quilt, it inspired me to look for other unique fabrics and needle arts that can be incorporated into quilting projects.

Our oldest sister is visiting the farm for the summer and I introduced her to one of my favorite trash/treasure shops. This funky place has a special room dedicated to crafts and all kinds of needle arts. The room is stuffed with a huge stash of books and patterns and treasures and big sis became a big fan (she’s a knitter, so she was no competition — unlike some people we know).

So bright and early Saturday morning I found two completed cross stitch pieces that I think would make a special accessory in a toddler room. Feast your eyes on these sweet babies with massive up-cycle potential:

IMG_1620[1]

This little spring-like scene makes me so happy!

IMG_1623[1]

The original needle is still embedded in the fabric. The extra threads are neatly organized with the original instructions.

The panels are dated 1975. I can’t believe how long ago that was — and I remember it like it was yesterday!  Each panel is 11.5×8 inches. And, despite my poor photography skills, both have similar eggshell white backgrounds. During our Saturday saling adventure I also found an old crib sheet made of 100%  Portuguese cotton in a red gingham. Maybe I can find a way to include that fabric in my project.

I’m taking suggestions: what would you create with these fab finds?

Candy Under Wraps Quilt

Today we are going to finish our Candy Under Wraps Quilt.  You should have 9 blocks made with 4 candies in each block.  Each of your 9 blocks should measure 11 inches square and should resemble the photo below.

DSCN4837

Now we need to cut the remaining fabrics.  You will need approximately  24 inches or 2/3 yard of white fabric.  From this white fabric cut the following pieces:

  • 2 squares that measure 16 7/8 inches x 16 7/8 inches (for side setting triangles)
  • 2 squares that measure 9 1/2 inches x 9 1/2 inches (for corner triangles)
  • 4 squares that measure 11 inches x 11 inches (for quilt center)

Cut Side Setting Triangles

Grab your two 16 7/8 inch squares and make two cuts from corner to corner as shown below.

17 inch fabric cuts

After cutting your two 16 7/8 inch squares, you should have eight side setting triangles.

Cut Corner Triangles

Grab your two 9 1/2 inch square and cut each square from corner to corner as shown below.

9 inch fabric cuts

After cutting your two 9 1/2 inch squares, you should have four corner triangles.

Quilt Layout

Using the layout diagram below, lay out your quilt blocks and side setting triangles  as shown.  I’ve labeled the rows to help you keep things straight.  Note the orientation of the side setting triangles.  We won’t use the corner triangles just yet so set them aside for later.

Candy Under Wraps Block Layout

Begin sewing the blocks in each row together.

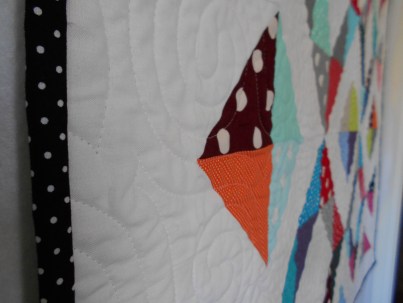
***Note***  When you sew a side setting triangle to a square block, you will have a “triangle tail” that goes beyond the square block (note top right hand side of photo below).  DO NOT CUT THIS OFF!  You will need this extra fabric when you begin sewing rows 1 – 5 together.

DSCN4906

Below is another close up view of a triangle tail.

2015-12-15 09.36.27

Once you have the blocks in each row sewn together, sew your rows together and press your seams.  Your quilt should look like the photo below.

Candy Under Wraps Block Layout Sewn together

Lots of fun sewing these rows together!  Oops!  Ran out of bobbin thread, need to make a quick change!

2015-12-10 18.23.12

After your rows are sewn together, your side setting triangles and blocks should intersect as shown in the photo below.  Don’t worry about the crooked looking finish.  I know, I know…it bothers me too, but we will take care of this crooked problem in just a few more steps!

2015-12-15 09.56.32

Sew Corner Triangles

Now that all our rows are sewn together, the last pieces we sew are the corner triangles.  Your corners should look like the photo below with triangle tails on each side.

2015-12-10 18.40.43


With right sides together, pin your corner triangles to each corner of the quilt top.  Your corners should look like the photo below.  Press seams toward the white corner triangle.

2015-12-15 09.44.26

Trim Quilt Top

Before we sew on the outer border, we have to trim and square up the quilt top.  We will start by measuring and marking 1/4 inch from the intersection of the aqua block and the side setting triangles.  Measure and mark all the way around your quilt top and then trim away the extra fabric.

DSCN4949

I used a mechanical pencil to mark my cutting line and then I used my scissors to carefully cut along this pencil line.  I was afraid I might slip with my rotary cutter! Whew!  Disaster averted!

DSCN4948

Cut and Add Outer Borders

From your outer border fabric, cut four  5 1/2 inch strips from the lengthwise direction of your fabric.  If you cut from the lengthwise direction of fabric, you will avoid having to piece (and match!) seams from larger prints like the one I used.

Sew a border strip to the left side and the right side of the quilt top.  Then sew a border strip to the top and the bottom of the quilt top.  Your quilt should look like the photo below.

DSCN4986

Quilt and Bind

Quilt and bind your quilt using your favorite techniques.

DSCN5478

Thanks for sewing along with our “Candy Under Wraps” quilt!  Our design can be used for any themed fabric of your choosing, the possibilities are endless!  This is a great quilt to use as a stash buster or a scrap buster.  Stay tuned for more sew alongs!

Candy Under Wraps Quilt

When I saw “Desert Sand” from the “Canyon Collection” by Kate Spain for Moda fabrics, I fell in love!

What to do with a fabric I love?  I designed a quilt around this beautiful fabric.  My Candy Under Wraps Quilt is the result!

Full Shot

Candy Under Wraps


While wandering through a favorite quilt shop, I came across a charm pack of Robert Kaufman pastel solids that complemented the Desert Sand fabric and reminded me of Salt Water Taffy.  Personally, the green taffies are my absolute fave!

While we were growing up on the farm, mom and dad always made sure we went to the county fair at summer’s end.  We would always buy a big box of Salt Water Taffy as a take home souvenir.  Throwing the empty wrappers at annoying sisters on the drive home was very fun but got me into trouble!

For the next few weeks I’ll be posting a sew along for how to make my Candy Under Wraps Quilt.  I hope you’ll join me!

The colors of your quilt can be adjusted to fit your taste in wrapped candy; Salt Water Taffy, Jolly Ranchers, Tootsie Rolls, Butterscotch, Peppermints, Smarties (striped fabric would be cute), Halloween candy, Christmas candy, and the list goes on!

Finished quilt size:  53 inches x 53 inches

Block size:  11 inches  x  11 inches

Here are the fabric requirements for the quilt:

36 charm squares for candies

Aqua fabric for blocks:  3/4 yard

White fabric for candies, solid blocks and setting triangles: 1 1/2 yard

Outer border:  1 3/4 yards

Binding:  1/2 yard

Backing:  3 1/4 yards

DSCN5414

Your homework for this week:  Look through your stash for just the right fabrics OR buy the fabrics that speak to you!

Misc. Monday

I am finishing up several projects that have been in the works for a few months.  My quilt guild sponsored a sew in one weekend and we were challenged to make a quilt using charm squares.  I was drawn to a pack of Dottie Polka Dots from Moda Fabrics.

DSCN5343

I used a quilt pattern from 3 Times the Charm – Book Two by Me and My Sister Designs.  This is a great book filled with adorable quilt patterns!  I have made several baby quilts using the patterns in this book.  Although the patterns work well for charm packs, I’ve also made a quilt or two using scraps from my stash.

DSCN5364

By the time I got around to making my binding, most of the Moda Dottie Polka Dot fabrics were sold out at my favorite quilt shop.  BUT  I did find a nice black and white polka dot design from Riley Blake Fabrics.  I think the black and white binding frames the quilt and adds nice contrast to all the bright colors.

DSCN5353

I used an aqua and white polka dot fabric for the quilt back and I am very happy with the results!  I always send my quilts to a local long arm expert, Ms. JM.  She does an incredible job and here is a close up of her work.

DSCN5358

This was a fast, fun and easy quilting project.  If you are new to quilting, this book would be a nice resource to help you get started on your quilting journey.

DSCN5343.JPG