Candy Under Wraps Quilt

Now that we all have our fabrics, let’s cut and sew our candies!  I think these  KONA cotton solids in pastel colors are a perfect match for my Desert Sand fabric.

DSCN4783

You will need 36 charm squares to make 36 candies.  Cut each charm square as noted below. Charm Cut

Check out my pile of scraps!  Sandy will love some of these tiny pieces!  She will get a tiny piece care package in the mail sometime soon!

DSCN4676

Now that all my candies are cut out, I have larger left over pieces from my charm squares that I am going to  save for another project.  I decided to put them in a plastic sandwich bag with the label to help me stay organized!

DSCN4783

Grab your white fabric because the next step in our candy making process is to cut out 144 white squares that measure  1.5 inches x 1.5 inches.  Here is the cutting diagram for you to use:

Square cuts for candies

Yay!  Cutting is done for now!  Let’s start sewing!  Here is what you should have for each candy:

Candy Center:  1 rectangle that measures 3.5 inches long x 2 inches high

Candy Ends:  2 rectangles that measure  2 inches long x 1.5 inches high and 4 white squares that measure 1.5 inches x 1.5 inches.

We sew the candy ends first. With a pencil draw a diagonal line from corner to corner on the white square and pin it to the right side of one of the candy end rectangles that measures 2 inches long x 1.5 inches high.

DSCN4705

Next, sew on the diagonal pencil line and trim the seam to 1/4 inch.

DSCN4713

Press the seam toward the white fabric.

DSCN4719

Next, grab another white square, draw a diagonal from corner to corner and sew it to the left side of the rectangle.

DSCN4722

Trim the seam to 1/4 inch

DSCN4726

Press the seam toward the white.  Your candy end should look like the photo below – it’s called a “Flying Geese” unit.  Make two of these flying geese units for each candy.

DSCN4733

For each flying geese unit, we only need 1/4 inch of white fabric above the blue triangle so we have to trim off some of the white fabric.

Flying Geese Cut

With your ruler, measure 1/4 inch above each triangle and trim the white fabric as shown below:

DSCN4739

Next, with right sides together, pin your two flying geese units to each end of the 3.5 inch x 2 inch rectangle that is your candy center.

DSCN4748

Using 1/4 inch seam allowance sew the flying geese units to the candy center. Your candy should look like this:

DSCN4754

Next, press the seams toward the candy center.  The back of your candy will look like this:

DSCN4758

The front of your candies will look like this:


DSCN4689


Hooray!  You’ve just completed one candy!  Now you get to make 35 more for a total of 36 candies!  Here are mine, I had fun making piles!


DSCN4765

Have fun making your candy piles!  Next week, we will continue cutting and sewing to make larger four candy blocks.


Misc. Monday

I am finishing up several projects that have been in the works for a few months.  My quilt guild sponsored a sew in one weekend and we were challenged to make a quilt using charm squares.  I was drawn to a pack of Dottie Polka Dots from Moda Fabrics.

DSCN5343

I used a quilt pattern from 3 Times the Charm – Book Two by Me and My Sister Designs.  This is a great book filled with adorable quilt patterns!  I have made several baby quilts using the patterns in this book.  Although the patterns work well for charm packs, I’ve also made a quilt or two using scraps from my stash.

DSCN5364

By the time I got around to making my binding, most of the Moda Dottie Polka Dot fabrics were sold out at my favorite quilt shop.  BUT  I did find a nice black and white polka dot design from Riley Blake Fabrics.  I think the black and white binding frames the quilt and adds nice contrast to all the bright colors.

DSCN5353

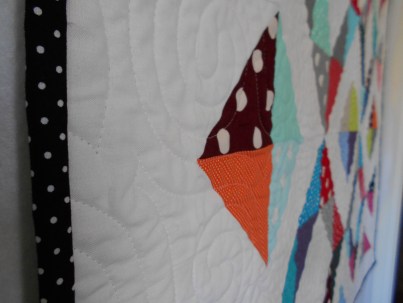
I used an aqua and white polka dot fabric for the quilt back and I am very happy with the results!  I always send my quilts to a local long arm expert, Ms. JM.  She does an incredible job and here is a close up of her work.

DSCN5358

This was a fast, fun and easy quilting project.  If you are new to quilting, this book would be a nice resource to help you get started on your quilting journey.

DSCN5343.JPG

Rolly Polly Teddy Finale

Yesterday’s giant rain/snow/sleet/snow storm brought winter to my house for what feels the first time this year. We lost two beautiful full-grown river birch trees. This one is in the back of the house. The other is in the front. Too the far right you can see that my neighbor also lost several birches.  It’s sad to say goodbye to these graceful gentle trees (cue “Circle of Life” music). However, my neighbors have already moved on — they are proposing a summer bonfire to enjoy the trees one last time. I think I’ll be over the grieving by then. IMG_1163[1]Cindy has done me a solid. She made a handy-dandy grid for my Roly Poly Teddy quilt that will help you lay out the rich and luxurious brown and gold teddy squares we gathered earlier. Then she went one step farther and exploded the Teddy the grid so you can see how to pull the teddy rows together.

Here’s my finished quilt top. Dimensions are 43″x 45″. You can find the original blog post here.

IMG_1082[1]

Rolly Polly Teddy Bear

I’ve created a pink and brown flannel backing. I’m hoping to work on the quilt sandwich today.

<updated below>

IMG_1337[1]

Roly Poly Teddy Bear quilted — can you see the bears and hearts? Adorable!

Cindy’s beautifully written pattern Roly Poly Teddy Bear Pattern FINAL.

Gather your scraps for a Teddy Bear Party!

IMG_1082[1]

Roly Poly Teddy Bear Baby Quilt

Today I’m going to give you all the scrap requirements for the Roly Poly Teddy Bear baby quilt. I had no idea how many brown scraps I had. Then I remembered that I made a Ginger Belle quilt designed by Carrie L. Nelson last fall. I used prints from the Kansas Troubles Harvest Moon line.  The quilt seemed a little dark when I was sewing it, but I was so pleased with the end result — that quilt was very hard to give away.

When I dug through my 3 inch squares, I had plenty of brown and dark gold prints to choose from. If you don’t have a lot of brown, I think this quilt could be made in almost any color.

Scrap fabric requirements:

3″ squares

168 white/cream squares

98 brown squares

18 pink squares

2″ squares

8 brown squares

2.5″ Squares

12 brown squares

4 white/cream

1″x3.5″ strip

16 pink

3.5″ pink strips for the border

Use your design board to lay out the general shape of the bear. I find it easiest to start with the head.

Contemplate the layout. I’ll be back next week with the sewing instructions for this simple sweet bear.

IMG_1082[1]

Roly Poly Teddy Bear Baby Quilt

IMG_1337[1]

Roly Poly Teddy Bear finish

Roly Poly Teddy Bear Pattern FINAL