Candy Under Wraps Quilt

When I saw “Desert Sand” from the “Canyon Collection” by Kate Spain for Moda fabrics, I fell in love!

What to do with a fabric I love?  I designed a quilt around this beautiful fabric.  My Candy Under Wraps Quilt is the result!

Full Shot

Candy Under Wraps


While wandering through a favorite quilt shop, I came across a charm pack of Robert Kaufman pastel solids that complemented the Desert Sand fabric and reminded me of Salt Water Taffy.  Personally, the green taffies are my absolute fave!

While we were growing up on the farm, mom and dad always made sure we went to the county fair at summer’s end.  We would always buy a big box of Salt Water Taffy as a take home souvenir.  Throwing the empty wrappers at annoying sisters on the drive home was very fun but got me into trouble!

For the next few weeks I’ll be posting a sew along for how to make my Candy Under Wraps Quilt.  I hope you’ll join me!

The colors of your quilt can be adjusted to fit your taste in wrapped candy; Salt Water Taffy, Jolly Ranchers, Tootsie Rolls, Butterscotch, Peppermints, Smarties (striped fabric would be cute), Halloween candy, Christmas candy, and the list goes on!

Finished quilt size:  53 inches x 53 inches

Block size:  11 inches  x  11 inches

Here are the fabric requirements for the quilt:

36 charm squares for candies

Aqua fabric for blocks:  3/4 yard

White fabric for candies, solid blocks and setting triangles: 1 1/2 yard

Outer border:  1 3/4 yards

Binding:  1/2 yard

Backing:  3 1/4 yards

DSCN5414

Your homework for this week:  Look through your stash for just the right fabrics OR buy the fabrics that speak to you!

Rolly Polly Teddy Finale

Yesterday’s giant rain/snow/sleet/snow storm brought winter to my house for what feels the first time this year. We lost two beautiful full-grown river birch trees. This one is in the back of the house. The other is in the front. Too the far right you can see that my neighbor also lost several birches.  It’s sad to say goodbye to these graceful gentle trees (cue “Circle of Life” music). However, my neighbors have already moved on — they are proposing a summer bonfire to enjoy the trees one last time. I think I’ll be over the grieving by then. IMG_1163[1]Cindy has done me a solid. She made a handy-dandy grid for my Roly Poly Teddy quilt that will help you lay out the rich and luxurious brown and gold teddy squares we gathered earlier. Then she went one step farther and exploded the Teddy the grid so you can see how to pull the teddy rows together.

Here’s my finished quilt top. Dimensions are 43″x 45″. You can find the original blog post here.

IMG_1082[1]

Rolly Polly Teddy Bear

I’ve created a pink and brown flannel backing. I’m hoping to work on the quilt sandwich today.

<updated below>

IMG_1337[1]

Roly Poly Teddy Bear quilted — can you see the bears and hearts? Adorable!

Cindy’s beautifully written pattern Roly Poly Teddy Bear Pattern FINAL.

Gather your scraps for a Teddy Bear Party!

IMG_1082[1]

Roly Poly Teddy Bear Baby Quilt

Today I’m going to give you all the scrap requirements for the Roly Poly Teddy Bear baby quilt. I had no idea how many brown scraps I had. Then I remembered that I made a Ginger Belle quilt designed by Carrie L. Nelson last fall. I used prints from the Kansas Troubles Harvest Moon line.  The quilt seemed a little dark when I was sewing it, but I was so pleased with the end result — that quilt was very hard to give away.

When I dug through my 3 inch squares, I had plenty of brown and dark gold prints to choose from. If you don’t have a lot of brown, I think this quilt could be made in almost any color.

Scrap fabric requirements:

3″ squares

168 white/cream squares

98 brown squares

18 pink squares

2″ squares

8 brown squares

2.5″ Squares

12 brown squares

4 white/cream

1″x3.5″ strip

16 pink

3.5″ pink strips for the border

Use your design board to lay out the general shape of the bear. I find it easiest to start with the head.

Contemplate the layout. I’ll be back next week with the sewing instructions for this simple sweet bear.

IMG_1082[1]

Roly Poly Teddy Bear Baby Quilt

IMG_1337[1]

Roly Poly Teddy Bear finish

Roly Poly Teddy Bear Pattern FINAL

Left Over Monday Glam Girl Mini Pillows

I had two “practice” glam girl blocks left over from my wall hanging and decided to make some mini pillows.  What do you think?  The smaller pillow has a marabou door hanger for an extra bit of glamour!Slide1For the larger mini pillow, I trimmed the left side and the right side so there is 1/2 inch of white fabric on each side.  Then I added 3/4 inch of white fabric to the top of the block and to the bottom of the block. Slide2

Next I added a two inch pink border to both sides and then the top and bottom.

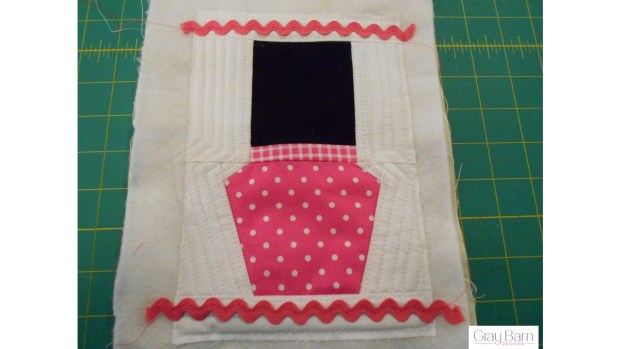
Then I made a quilt sandwich: muslin on the bottom, batting in the middle and the quilt block on top.  I am practicing my machine quilting skills and am getting braver with each attempt!  I meandered around the white fabric and used a decorative loop stitch on the left and right pink borders.

Then I decided it needed rick rack.  You could personalize or embellish this block by adding machine embroidery.  I wish I thought about this before I sewed my pillows together!  Slide16

Finally, with right sides together, I sewed the quilt block to a cute backing fabric (using a 1/2 inch seam allowance) and leaving a 3 inch space to turn the pillow inside out.  Clip your corners and stuff your pillow.  Slip stitch the opening closed.  Slide12

Cuteness plus!Slide13

On to the door hanger!Slide6

I trimmed the block so there is a 1 inch white border on the left and right sides of the block.  I added a 1 1/4 inch strip of white fabric to the top and to the bottom.

Like the pillow above, I quilted the block and added rick rack.  Add some machine embroidery to personalize your door hanger!  Slide5

Pin your marabou 1 inch from the corners of your quilted block.Slide7

Pin your pillow backing fabric to the quilt block and marabou, right sides facing each other.  Use a 1/2 inch seam allowance and sew around the outside of your door hanger, leaving a 3 inch opening at the bottom. I reinforced the stitches at the opening.Slide10

The top of your door hanger will look like this.  Trim off the extra marabou and clip your corners on the diagonal (making sure you don’t cut your stitches).Slide9

Turn your door hanger right side out and stuff.  Slip stitch the opening closed.  Since I don’t have an embroidery machine, I added some wording with my computer so you can see the possibilities!Slide11

Leftovers can be fast and fun!  These are small little projects that have a big cuteness impact!  Plus I got to continue practicing my machine quilting skills!

Send us pictures of your mini pillow projects, we would love to see how you personalize your little minis! Slide1