Paper Piecing Sew Along – Day 3

Need a cute Christmas stocking block?  You can stop your search, Sandy has cornered the Christmas stocking cuteness block.

Branded Stocking facing right

We know some people like their Christmas stockings to face  right and others like them to face left.  That’s why Sandy created a pattern for each!


face right brand

These two patterns are super easy and a great way to practice  your paper piecing skills.  Click on the links below and get ready for maximum cuteness!

stocking_pp_toe face right

stocking_pp_toe face left


Mid-January Power Sewing

Except for my exercise plan <ahem>, I’m having a very productive early January! I took two big winter weather events in stride and stuck to my quilting plan for the year. I know it’s early, but it’s still a reason to celebrate, don’t you think?  Let me enumerate:

  1. I rearranged my sewing space based on some great advice/comments I received to my Let There be Light post. As a result, there is currently nothing below my window — whew. Boots has been able reclaim his napping spot and my computer desk is oriented so that it’s facing the door, not beside it. My ironing board is now where the desk was and the sewing cabinet is back in it’s old spot to the left of the window.  Somehow the flow feels much, much better. I should learn more about Feng Shui (including how to pronounce it). There is certainly something calming about a well-designed room.
    IMG_0796[1]

    Bootsie lounging in his favorite chair with the sun warming his old bones. He’s an indoor-outdoor kitty, but he hasn’t been outside in days. The snow would surely be above his head! My original design Boudoir quilt is in the background. 

  2. My Drops of Rainbow quilt has been back from Ms. G, (my wonderful long arm quilter) for a couple of weeks. I attached the binding right away, but then got distracted by Christmas. Since it wasn’t a planned gift, I brought it and my hand-binding kit down to the family room, expecting to  finish it quickly. Then came more distractions, additional glasses of wine, mountains of bon-bon eating, etc. etc. Meanwhile, the quilt was put to good use. My son likes to sleep on that sofa and he’s an equal opportunity quilt snuggler, so the not-quite-completed quilt made for handy napping. However, Friday night’s big snowfall meant that there was no more viable distractions/excuses: it was time to start bonding with my quilt. I finished the binding on last night.
    IMG_0794[1]

    I know, I know, I’ve read that you can attach both sides of a binding with a machine, but I love the handwork at the end of the creative process!

  3. One of my friends retired this year. Around the same time, her daughter passed away quickly and unexpectedly. My heart aches for her and I’m making a quilt to hopefully bring her some comfort. Finally all the pieces are cut and I can start putting them together. I am hoping for a May completion date, which will be in time for her birthday. True Blue from Miss Rosie’s Spice of Life Quilts will contain 100 cream/blue blocks surrounded by a piano key border. IMG_0803[1]
  4. My Pottery Barn up-cycled table runner is nearly complete. I created this paper-pieced Spring Chicken to go with the dust ruffle flowers and she just makes me smile! You can make her too with this pattern.Spring_chicken_logopic

And just for fun, here is a frost-covered maple tree that marks one of the farm’s boundaries. When I drove by yesterday (Sunday), there was a magnificent hawk perched in the very tippy top branches. Alas, I scared her away before I could snap a portrait, but the tree was too beautiful to ignore. This blue is unedited — it’s incredible, isn’t it?IMG_0807[1]


IMG_0808[1]

A bright clear and cold Sunday morning at the summit of the farm.

Are you accomplishing your January goals?

Glam Girl Lipstick Mini Quilt

My mini quilt obsession continues with another one of Sandy’s great designs!  This  foundation paper pieced pattern is from the Glam Girl Series that Sandy is known for.   Since it’s almost spring here in Ohio, I was inspired to use some “springy” colors from my stash.  What do you think?

DSCN5623

I am still “refining” my machine quilting skills.  Since I love polka dots so much, I added more to the binding.  I like the results!

DSCN5620

The finished size of this mini quilt is 6 inches wide by 11 inches long.  It is the perfect size to hang in a narrow space AND you can use this pattern for some of those skinny mini quilt swaps!

DSCN5624

Like this pattern?  Download it here:Glam Girl Lipstick Mini Quilt

Sandy has designed this pattern to be fast and fun!  Your lipstick mini quilt is sure to pack a punch of glamorous cuteness where ever it lands!


Left Over Monday Glam Girl Mini Pillows

I had two “practice” glam girl blocks left over from my wall hanging and decided to make some mini pillows.  What do you think?  The smaller pillow has a marabou door hanger for an extra bit of glamour!Slide1For the larger mini pillow, I trimmed the left side and the right side so there is 1/2 inch of white fabric on each side.  Then I added 3/4 inch of white fabric to the top of the block and to the bottom of the block. Slide2

Next I added a two inch pink border to both sides and then the top and bottom.

Then I made a quilt sandwich: muslin on the bottom, batting in the middle and the quilt block on top.  I am practicing my machine quilting skills and am getting braver with each attempt!  I meandered around the white fabric and used a decorative loop stitch on the left and right pink borders.

Then I decided it needed rick rack.  You could personalize or embellish this block by adding machine embroidery.  I wish I thought about this before I sewed my pillows together!  Slide16

Finally, with right sides together, I sewed the quilt block to a cute backing fabric (using a 1/2 inch seam allowance) and leaving a 3 inch space to turn the pillow inside out.  Clip your corners and stuff your pillow.  Slip stitch the opening closed.  Slide12

Cuteness plus!Slide13

On to the door hanger!Slide6

I trimmed the block so there is a 1 inch white border on the left and right sides of the block.  I added a 1 1/4 inch strip of white fabric to the top and to the bottom.

Like the pillow above, I quilted the block and added rick rack.  Add some machine embroidery to personalize your door hanger!  Slide5

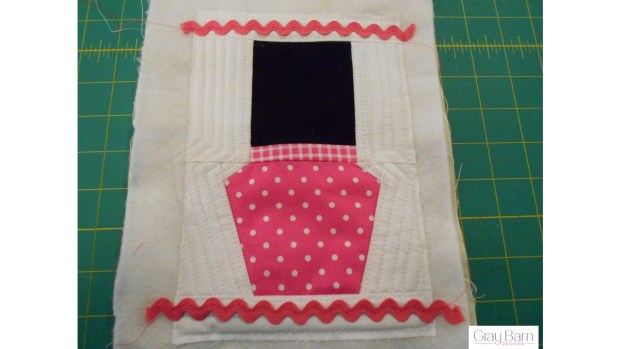
Pin your marabou 1 inch from the corners of your quilted block.Slide7

Pin your pillow backing fabric to the quilt block and marabou, right sides facing each other.  Use a 1/2 inch seam allowance and sew around the outside of your door hanger, leaving a 3 inch opening at the bottom. I reinforced the stitches at the opening.Slide10

The top of your door hanger will look like this.  Trim off the extra marabou and clip your corners on the diagonal (making sure you don’t cut your stitches).Slide9

Turn your door hanger right side out and stuff.  Slip stitch the opening closed.  Since I don’t have an embroidery machine, I added some wording with my computer so you can see the possibilities!Slide11

Leftovers can be fast and fun!  These are small little projects that have a big cuteness impact!  Plus I got to continue practicing my machine quilting skills!

Send us pictures of your mini pillow projects, we would love to see how you personalize your little minis! Slide1